
Make Your Own DIY Boutonnière
 Making your own boutonnière for the groom is a great way to add a personal touch to your wedding. Since it can be made a day ahead, you’ll have time to craft something special. Buying a few extra flowers will give you a chance to practice getting just the right look you want.
Begin by selecting a flower that has a rather large head. Roses work well but don’t be afraid to try other combinations to create a unique look and to complement your wedding colours. You’ll also need some greenery like a fern frond, or ivy leaf. Aside from your flowers and greenery, here’s a list of the additional supplies you’ll need:
- Bucket
- Floral wire
- Waxed floral tape (preferably in green)
- Pearl or white tipped corsage pins
- Pencil
- Small resealable plastic bag
- Ribbon in a colour that coordinates with wedding colours
- Sharp knife or stem cutter and stripper
- Wire cutter
The first step is to remove the foliage and thorns (if you’re using roses) from the stems as well as any petals that don’t look just right. Fill a sink or bucket with water and, while holding stems under the water, make an angled cut about two inches from the bottom of the stem. Keep the stems under the water for a few minutes to let them get a good long drink. Place the stems in cool water until you’re ready for them.
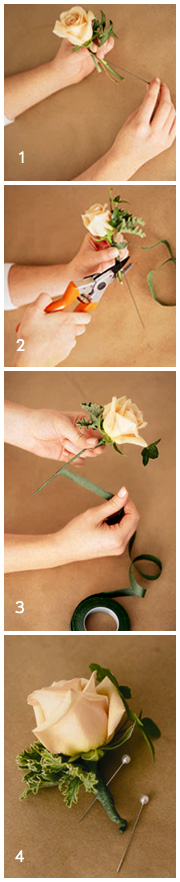
Choose a stem and trim it to about three inches with a sharp knife or stem cutter. Next, you’ll create the bed for the flower with your greenery. Place the greenery behind the flower, letting it extend just beyond the top of the flower(not too far) and visible from both sides. Next place a piece of floral wire, cut to about six inches, behind the stems.
Now you’re ready to wrap the boutonnière. Using the floral tape, start wrapping the stems from the top, downward in a spiral pattern. Once about 3/4 of an inch is covered, cut away the rest of the stem. Then continue wrapping the tape around the floral wire for about 3 more inches. Working your way back to the top, continue wrapping the floral tape around. When you’ve reached the top, make a few extra wraps to secure it, then cut off excess tape.
To complete the look, trim the stem and wire you’ve wrapped to a length of about 1 1/2 inches. Next you curl the end around the point of your pencil, then pinch it tight at the tip. You’re now ready to add a bow, if that’s part of your design. Attach the corsage pin (you may need two if the boutonnière is heavy to hold in place properly). These will be used when it’s time to attach it to the lapel.
Mist the finished boutonnière with water and place it in the sandwich bag. Before you seal the bag, blow a puff of breath in to keep airspace around it. Place the bag in the refrigerator and you’re ready for the big day!